Blog

Edamame Avocado Toast

Did I just hear somebody say plant-based foods are boring and have no exciting flavors? Sorry! You are absolutely wrong. Whole Food plant-based foods are full of flavors, textures, and colors. Above all, they are very nutritious, healthy,  and sustainable. People often ask me if I only eat plants and fruits and the answer is NO. One can incorporate whole grains, seeds, nuts, green leafy vegetables, fruits, and tofu. I know the list is long but very flavorful. 

Avocado on board
Avocado on board” by Kjokkenutstyr.net is licensed under CC BY-SA 2.0.

I also love to travel to different parts of the world with my family. Food takes you back to your travel destination.  When I travel I make sure I visit the local grocery store or farmers market. I believe food is a medium to connect with each other.

We can find so much about our cultures and traditions through food. Food brings the communities together. I had never tried hummus while growing up in India. We were very focused to eat only Indian food. When I came to the US I tried hummus and totally fell in love with this delicious dip. Then I thought to be creative and make some changes to traditional hummus and made it whole food plant based without oil.

11/07/09 - Edamame Hummus
11/07/09 – Edamame Hummus” by trpnblies7 is licensed under CC BY-NC-ND 2.0.

Let’s give some twists to a typical hummus toast.  First, let me explain a little about hummus. Hummus is originally from the Middle East. Hummus is eaten as a spread on sandwiches or a dressing on salads or with crackers and pita bread. Hummus tastes great with vegetables. It’s my all-time favorite way to eat. My kids enjoy dipping vegetables in hummus and enjoy veggies any time. It’s a great way to incorporate vegetables into your diet. Traditionally hummus is made with chickpeas, tahini, and olive oil. Tahini is a sesame paste. Store-bought hummus is loaded with preservatives, oils, and very high salt content.

Sprouted Whole Grain Bread Ezekiel 4:19
Sprouted Whole Grain Bread Ezekiel 4:19” by artizone is licensed under CC BY-NC-ND 2.0.

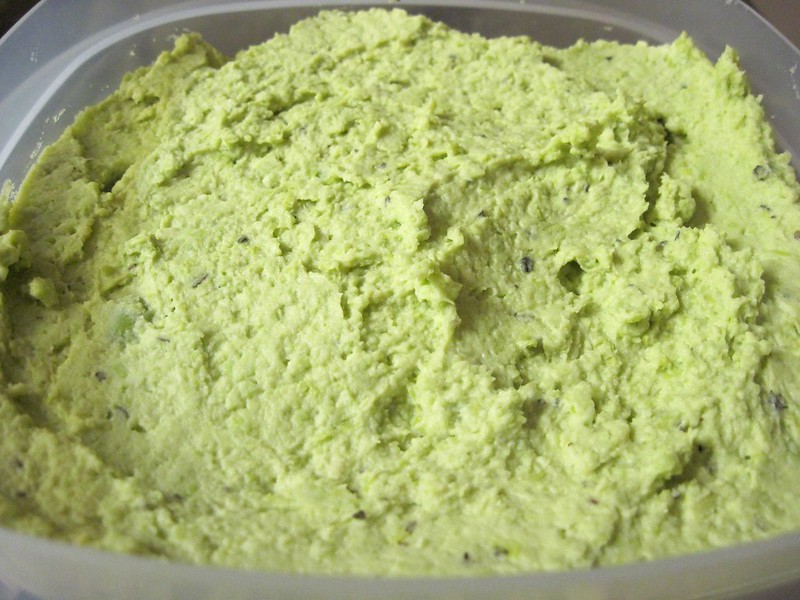
In this new twist, I have added edamame, garlic, avocado, tahini, chickpeas, and fresh lemon juice. There is no need to add anything which is processed. Without adding olive oil, hummus tastes great. Any type of oil is not good for the human body. It impairs the arteries. Avocado and tahini have natural fats,  then why jam out arteries with extra fat or bad fat in our diets? Nature has blessed us with a great selection of fruits and vegetables. So let’s nourish yourself with these great options around us. Chickpeas, tahini, and avocados are good sources of plant proteins. The best part is hummus is very convenient and easy to make at home and stored in the refrigerator for a longer period. Many variations are possible with hummus recipes. If you like you can add beets, jalapenos, bell peppers, fresh herbs, spices, etc. One just needs to be creative because possibilities are endless. In this hummus, I explored different flavors with avocado and edamame. Guess it turned out very creamy and rich in texture and flavor without adding olive oil. Let me share my hummus recipe with a twist. If you like it spicy you can sprinkle cayenne pepper or paprika for some extra kick.

Ingredients

1 cup shelled edamame; thawed
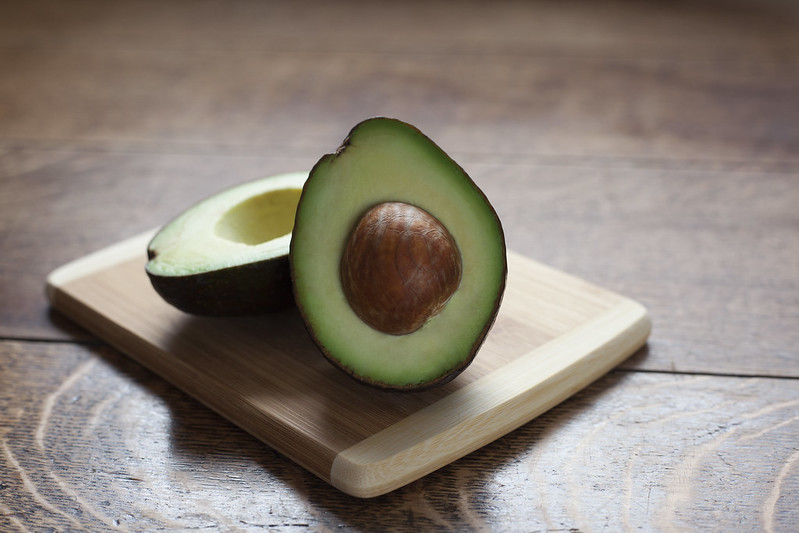
1 avocado; pitted 
1 can chickpeas; no salt
2 tbsp tahini
Sea salt; adjust to taste
Lemon juice; 2 tablespoon
Ground black pepper: adjust to taste
1 tbsp beets; shredded (optional)
1 tbsp carrots: shredded (optional)
2 slices of bread; whole wheat or sprouted

Method

  1. Drain a can of chickpeas. Transfer the chickpeas to a small mixing bowl.
  2. Carefully cut the avocado. Remove the pit. Scoop the flesh with a spoon and add to the chickpea bowl.
  3. Add shelled and thawed edamame to the chickpea bowl.
  4. Transfer all the ingredients from the mixing bowl to the blender jar.
  5. In the blender jar add tahini, sea salt, lemon juice, and ground black pepper,
  6.  Close the lid of the blender jar and turn on the blender to make a smooth paste.
  7. Once the hummus is ready, transfer it to a storage container.
  8. Take two slices of bread and put them in a bread toaster or bread oven. Adjust the toaster setting according to the given instruction. You can brown and crisp the bread according to your own preference. 
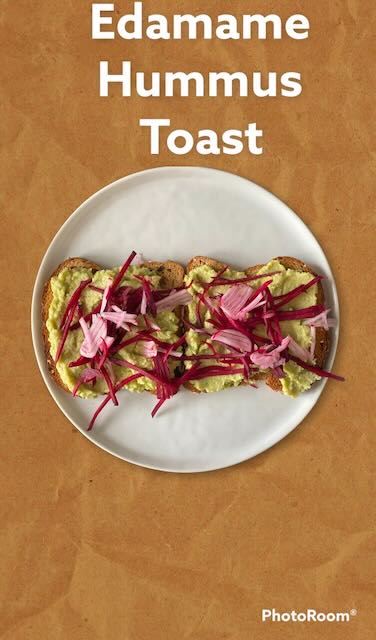
  9. Once the toast is ready with the help of a spoon, spread the hummus on the toast.
  10. Garnish with shredded beets or radish or your preferred vegetable.
  11. This recipe is so versatile that it can be enjoyed for breakfast, lunch, or dinner
  12. Another great way to enjoy it is with crackers and vegetables.
Edamame Avocado Hummus Toast © 2022 by Nidhi Bansal is licensed under CC BY-ND 4.0

Crispy Hot & Sweet Cauliflower Bites

Anyone who grew up in India knows about ‘Maggi Hot & Sweet Sauce‘. I know it was one thing I could not enjoy anything without. So I went on to experiment with ingredients in my pantry to create something close from scratch. I hope you enjoy the same as I and my family did.

ingredients

Coating

  • 1 Medium-size Cauliflower head; Cut florets;
  • 1/2 Cup Rolled Oats Flour
  • 1/4 Cup Quinoa Flour
  • 1/2 tsp Sriracha Powder
  • 1/2 to 1 Cup Plant-Based Milk (Quantity depends on type of milk)
  • 1/2 tsp Sea Salt (Adjust to taste)

Sauce

  • 4 tbsp Sriracha Sauce
  • 2 tbsp Maple Syrup
  • 2 tbsp Liquid Aminos

preparation

  1. Pre-Heat Oven at 400F
  2. Prepare a flat baking tray with parchment paper
  3. Mix all ingredients for the sauce in a bowl and set aside
  4. Mix all dry ingredients for the cauliflower coating in a large mixing bowl.
  5. Add part of plant-based milk in the dry mix and mix well. Keep adding and mixing the coating batter until like pancake mixture or thicker consistency is reached. We want to make sure the florets can be evenly coated without it being drippy.
  6. Add the cauliflower florets into the batter and mix well.
  7. Place the coated florets on the baking tray and place it in the oven for about 30mins. You are looking for even golden brown over the florets.
  8. Once golden brown, take out the cooked florets and mix in the sauce to evenly coat the sauce.
  9. Using the same baking tray, place the florets back for another 10mins in the oven.
  10. Enjoy with your favorite dip or bed of salad!!

Cauliflower Pakoras/Fritters

It is cold, cloudy and it is almost the weekend (at least in the Chicago area). Too lazy to cook an elaborate meal for the family so I decided to whip some pakoras to enjoy with dairy-free Indian Tea.

I remember when I was in India and even for a long time in the US, we would prepare and eat pakoras regularly. It is one of the most favorite snacks prepared in the Indian kitchen whether it is cold, rainy, gameday or something else. It is equally popular on a lot of restaurant menus too We would not only prepare the pakoras using cauliflower but also use a variety of other vegetables like spinach, green chili, potatoes, paneer, etc. and we would deep fry them in OIL.

Frying in OIL adds a lot of unwanted calories and saturated fat to the pakoras that our bodies really don’t need. Using an air-fryer or oven, helps me prepare the pakoras without having to add the extra calories and fat to it. Why not enjoy it guilt-free.

Ingredients

  • 1 medium-size cauliflower head; washed and cut florets
  • 1 small white onion; finely chopped
  • 2 serrano peppers; finely chopped (optional)
  • 1 tbsp ginger; finely chopped
  • 1/2 cup cilantro; washed and finely chopped
  • 1 1/2 cup chickpea flour (besan)
  • 1 tsp turmeric powder
  • 1/2 tsp red chili powder
  • 1/2 tsp garam masala
  • 1/4 tsp hing (asafoetida)
  • 1 tbsp lemon juice
  • 1/2 tsp salt (adjust to taste)
  • 1 1/4 cup water

Preparation

1. Preheat oven to 380 F.
2. In a mixing bowl, add onions, serrano pepper, ginger, cilantro, chickpea flour, turmeric, red chili powder, garam masala, hing, lemon juice, salt, and water. Mix well to make a batter.
3. Add cauliflower to the batter and coat cauliflower florets evenly with the batter
4. Set up a baking tray with parchment paper, place floret 1 inch apart on the baking tray.
5. Place the tray in the oven for 30 min and then flip the pakoras and put them back in for another 30 mins. You can increase or decrease the baking time depending on the crispiness of pakoras you prefer.
6. Enjoy this healthy oil-free snack/appetizer with green chutney.

Vegetable ‘Dum’ Biryani

Get ready to test your aroma buds!! I was walking through the aisles of my local Indian store and I came across this pack of Whole Biryani Masala and I told to myself that I need to make the biryani.

To my surprise, a couple of days later, I walk into the house, after a day of errands, with a house filled with aromas. My hubby was getting ready to surprise me with Vegetable ‘Dum’ Biryani. Plant-Based Hubby Chef in the making.

Biryani is an elegant and exquisite rice-based recipe with Persian roots. It is very popular throughout India and you would feel like you are preparing it as you would prepare a lasagne. Instead of sauce, you use vegetable gravy with plenty of whole spices to tickle your buds and instead of pasta sheets, you use brown-rice.

Ingredients (Rice)

  • 8 cups water
  • 2 bay leaf
  • 1-inch cinnamon stick
  • 1/2 tsp cloves
  • 1 star anise
  • 1/2 tsp whole black pepper
  • 3/4 tsp sea salt (adjust to taste)
  • 1 1/2 cups brown basmati rice

Ingredients (Vegetable Gravy)

  • 1 bay leaf
  • 1 1/2 – 2 inch cinnamon stick
  • 1/2 tsp cloves
  • 1 star anise
  • 1 tsp cumin seeds
  • 4 whole cardamom
  • 1 large onion; finely chopped
  • 1 tsp ginger; grated
  • 2 cloves garlic; grated
  • 2 – 2 1/2 cups mixed vegetables; carrots, cauliflower, broccoli, peas, potato, beans; chopped
  • 1 1/2 cup plant-based non-dairy yogurt; whisked
  • 1/2 – 1 tsp red chili powder (adjust to taste)
  • 1/2 tsp turmeric powder
  • 2 – 3 tsp biryani masala powder (adjust to taste)
  • 1 tsp sea salt (adjust to taste)
  • 1/2 cup coriander
  • 3 tbsp mint leaves or 10-12 mint leaves
  • 1 cup water
  • 7 – 8 oz. cubes extra firm Tofu; cube cut (approx. 15 cubes)

Ingredients (Garnish)

  • 15 mint leaves, chopped
  • 1/2 cup coriander, chopped
  • 1/4 cup saffron water
  • wheat dough, to seal

Preparation (Rice)

1. Take a medium saucepan and add 8 cups water, brown rice, bay leaves, cinnamon stick, cloves, star anise, whole pepper, and 1 tsp salt. Place on medium heat.
2. After the water boils, check regularly at 5 mins intervals if the rice is cooked. We do not want to cook the rice fully as we will be cooking it more with the gravy later.
3. Once the rice is cooked to your preference, drain the water from the rice using a colander. Rinse the rice using cold water to stop further cooking.

Preparation (Vegetable Gravy)

1. Take coriander, mint leaves and 1/4 cup water and puree in a blender. Keep aside.
2. Take a medium to large saucepan and place on medium heat.
3. When the saucepan is hot, add the bay leaf, cinnamon stick, cloves, star anise, whole cardamoms, cumin seeds. Dry roast for 1 min. You should feel the ingredients turning aromatic. Add 3 tbsp water to the saucepan to avoid burning.
4. Add the finely chopped onions to the saucepan and saute them. If needed, add 1-2 tbsp of water to avoid onions to stick to the pan. Saute until onions soften and turn translucent.
5. Add the grated ginger and garlic to the pan and mix well. Saute for 2 mins.
6. Add the chopped vegetables to the pan and mix well.
7. Add whisked yogurt, chili powder, turmeric powder, biryani masala, coriander-mint puree and salt to the saucepan. Mix well.
8. Add 1 cup water and cover the vegetable mix saucepan to cook on medium heat. Uncover at 5min intervals until the vegetables are almost cooked.
9. Add the cubed tofu and mix well to evenly cover the gravy over the tofu. Cook for another 2mins.
10. Remove from heat.

Preparation and Assembly (Vegetable Biryani)

1. Preheat oven 350F.
2. In oven-safe large cookware with cover, place a layer of the vegetable gravy followed by a layer of cooked brown rice. We would approximately have three layers so place the layers accordingly. This is like assembling a lasagne.
3. Spread a few chopped mint leaves, chopped coriander and a tsp of Saffron water.
4. Repeat step 2 and step 3 until you have completed used the vegetable gravy and brown rice.
5. Cover the cookware and seal it. You can use the dough prepared from the Roti/Chapati recipe.
6. Place the covered and sealed cookware in the oven for 25 mins. This is cooking the rice with the gravy and adding spice flavors to it.
7. Enjoy the biryani with Raita, Green Chutney and/or Pickle.

Badam Halwa (Almond Pudding)

Badam Halwa or Almond Pudding (couldn’t think of a better word) is an easy elegant dessert to satisfy your sweet tooth. This legacy dessert has roots all the way to royal kings and now is a regular when it comes to Indian festivities like Holi, Diwali, New Year celebration or cold winter nights.

Ingredients

– 1 cup almond flour
– 1/2 cup unsweetened apple sauce
– 1 cup plant-based non-dairy milk; unsweetened, unflavored
– 1 pinch saffron
– 3 tbsp maple syrup

Preparation

1. Place medium-size saucepan on low heat. Once heated, add almond flour to sauce-pan. Dry roast for 7-8 mins. Do not leave the almond flour unattended on the heat as it burns quickly.
2. Add apple sauce to the almond roasted flour and mix well.
3. Add plant-based milk and saffron. Mix well.
4. Add maple syrup, stir until the consistency thickens or milk is absorbed. Approximately 8-10 mins
5. Enjoy halwa warm or at room temp

Polenta Upma

Upma is one of the most common breakfast preferences in the Indian kitchen. It is dearly loved and made with multiple variations across India. One problem that it is commonly made with Suji or Semolina which is highly processed.

I have earlier tried to make Upma with Bulgar and Cracked Wheat which came out as a great option to satisfy the craving for Upma. In this version, I am using Polenta or Cornmeal as my base and this is so close or exact to how traditional Upma tastes like without adding Semolina.

Ingredients

  • 1/2 cup polenta
  • 8-10 curry leaves
  • 2 dry whole red chilies; broken halves
  • 1 tsp mustard seeds
  • 1/3 cup unsalted peanuts
  • 1 medium white onion; finely chopped
  • 1 small tomato; finely chopped
  • 1 cup frozen peas; thawed
  • 1/2 tsp garam masala
  • 1/4 tsp red chili powder
  • 1/2 tsp sea salt (adjust to taste)
  • 2 tbsp lemon juice
  • 1/4 cup cilantro; finely chopped
  • 1 serrano pepper; chopped (optional)

Preparation

1. Take a medium saucepan and place it on medium heat. Dry roast polenta for 5-6 minutes with continuous stirring. The polenta is done once the color darkens to golden yellow. Once done, keep aside.
2. Take another medium saucepan and place it on medium heat.
3. Dry roast curry leaves, mustard seeds, peanuts, and the split whole red chili peppers. Stir regularly and roast for 3-5 mins.
4. Add onions to the mix and stir. Add tbsp water if onions are sticking to the pan. Saute for at least 5 mins or when onions turn translucent.
5. Add peas to the mix and stir well. Saute for another 3 mins.
6. Add the chopped tomatoes and salt. Mix well. Saute the mix until the tomatoes soften. This normally takes 6-8 mins.
7. Add the dry roasted polenta and combine all the ingredients well.
8. Add 3 1/2 cups of water and lemon juice to the mix. Mix well.
9. Keep stirring the mix until the polenta absorbs the water. You may observe boil in the polenta mix. Lower the heat and keep stirring to semi-soft consistency.
10. Garnish with chopped green chilis and cilantro.

Crispy Baked Bhindi/Okra

A simple recipe from the Indian Kitchen but not traditional like Masala Bhindi is this Crispy Baked Okra. Okra aka Bhindi is a summer regular on the Indian kitchen table. Okra being a universal vegetable is turning favorite for everyone around the world.

Okra is also tricky at times when preparing. First, there is a trick to picking the Okra from your fresh market or store. Please try to pick tender or baby okra as it cooks and tastes better. The other tip is please wash the Okra and wipe it dry. This avoids the extra sticky residue while you cut the okra.

After making this awesome recipe, I enjoyed this as a topping over brown rice.

Ingredients

  • 4 cups Okra (Bhindi); sliced circle
  • 1 large white onion; finely chopped
  • 1 tbsp Ginger; chopped
  • 1/4 tsp Hing (Asafoetida)
  • 1 tsp Turmeric Powder
  • 1/2 tsp Garam masala
  • 1/2 tsp chili powder
  • 1 tbsp coriander powder
  • 1/2 tsp fennel seed powder
  • 1 tbsp lemon juice
    1/2 tsp Sea Salt (adjust to taste)

Preparation

1. Preheat oven at 375 F.
2. Take a large mixing bowl and add all ingredients. Mix well.
3. Take a baking tray and layer parchment paper.
4. Spread the Okra mix uniformly on the baking tray.
5. Place the baking tray inside the oven for 30mins.
6. After 30mins, using a flat spatula toss and/or flip the okra to cook from both sides. Place the tray back for another 30mins or more according to your desired crispness.
7. Enjoy with roti, naan, a side or a topping over cooked brown rice or quinoa.

Gol Gappa (Pani Puri)

‘Pani’ means water and ‘Puri’ means puffed crisps. Pani Puri is one of the most popular street foods and comes neck and neck with the papdi chaat. I and my family have enjoyed several trips to our local and favorite Pani Puri stand close to our home. The crunchy sweet-spicy treat brings a lot of memories from my childhood.

The Jal Jeera water is the sweet and tangy water that completes the Pani Puri recipe or has also been used as a welcome drink in a lot of Indian households especially during summers.

Ingredients (Pani Puri)

  • 1 cup multigrain flour
  • 1/4 cup water
  • 1/2 tsp sea salt (adjust to taste)

ingredients (Stuffing)

  • 1 medium potato; boiled; cooled; crushed
  • 1/2 cup chickpeas cooked; mashed
  • 1/2 tsp roasted cumin powder
  • 1 tbsp cilantro; chopped (optional)

Preparation (Stuffing)

1. Take a small bowl and place all ingredients for stuffing together
2. Mix well and keep aside

Preparation (Pani Puri)

1. Add the multigrain flour and salt together to a medium-sized bowl and whisk to mix well.
2. Add some of the water to the flour and salt mix. Start making the dough by kneading slowly. Add remaining water as needed to create a smooth and tight dough ball.
3. Preheat the air fryer to 390 F.
4. Make as many tennis ball-sized balls of dough as possible. If you don’t want or need to use all of the dough, make as many as you need.
5. Using a rolling pin on a dry flat surface, roll the dough thin but easy to lift to transfer to the air fryer.
6. Use a cookie cutter (2″ or 2.5″ round) to cut a circle from the flattened dough. Try to cut as many as possible. Extra dough can be made into more balls of dough and stored.
7. Lift carefully the small circles or puri (gol gappa) and transfer them to the preheated air fryer.
8. Once the puri (gol gappa) expands and puffs, turning light brown in color, flip them over. Once both sides are done, take them out from the air fryer and let them cool down completely.
9. Enjoy pani puri (gol gappa) by gently popping with the tip of your finger and gently filling with stuffing. You can enjoy the full experience by filling pani puri with jal jeera water.

Jal Jeera Water (Pani Puri)

‘Pani’ means water and ‘Puri’ means puffed crisps. Pani Puri is one of the most popular street foods and comes neck and neck with the papdi chaat. The Jal Jeera water is the sweet and tangy water that completes the Pani Puri recipe or has also been used as a welcome drink in a lot of Indian households especially during summers.

Ingredients

  • 1/2 brick of tamarind or 7 oz.; soaked in 1/4 cup of warm water for 3-4 hours
  • 1/3 cup cilantro leaves
  • 1/3 cup fresh mint leaves
  • 1 serrano pepper (optional)
  • 1 tbsp black salt (adjust to taste)
  • 1 tbsp roasted jeera (cumin seeds)
  • 1/4 tsp Hing (asafoetida)
  • 1/2 tsp garam masala
  • 4 tbsp date syrup

Preparation

1. Strain the soaked tamarind using a fine-meshed strainer into the mixing or medium-sized bowl. You may need the help of a spoon to press the tamarind on the strainer to get the maximum of tamarind pulp.
2. Add 5 cups of water and mix well with strained tamarind water.
3. In a blender, add cilantro leaves, fresh mint leaves, and serrano pepper. Blend them together. Avoid forming a thin paste.
4. Add the ingredients from the blender jar to the tamarind water. Mix well.
5. Add black salt, roasted cumin seeds, asafoetida, garam masala, and date syrup together. Mix well.
6. Cover the jal jeera water and let it sit in the refrigerator for 45-50 mins.
7. Enjoy with gol gappas (pani puri).

Lavash Samosa Roll

We all love Samosas. I prepared and posted earlier on how to prepare traditional samosas. I wish we all had the time to prepare samosas to enjoy this scrumptious appetizer. I recently came across and prepared these awesome Avacado Rolls from the forksoverknives.com website and thought to try and prepare the samosa mix and bake them.

Ingredients

– 1 medium white onion; finely chopped
– 2/3 Cups Frozen Peas; thawed
– 5 medium potatoes; boiled, cooled, and crushed
– 1 Sereno pepper (optional); finely chopped
– 1/4 Cup Cilantro; finely chopped
– 1 tbsp grated ginger
– 1/4 tsp Asafoetida
– 1/4 tsp Red chili powder
– 1/4 tsp Garam masala
– 1/2 tsp sea salt (adjust to taste)
– 1/2 tsp Turmeric powder
– 1/2 tsp cumin seeds
– 2 tbsp Coriander Powder
– 1 tsp Amchur (Dried Mango Powder)

Preparation

1. Take a medium sauce pan and place on medium heat. Dry roast the cumin seeds with asafoetida for 2 mins.
2. Add the onions to the saucepan. If onions stick to the pan, add one tbsp water. Sauté onions and stir until translucent and soft.
3. Add thawed peas to the mix. Sauté for 2 mins.
4. Add boiled/crushed potatoes.
5. Add turmeric, coriander powder, garam masala, red chili powder, amchur, and salt. Mix well.
6. Add ginger, cilantro, sereno pepper(optional)
7. Keep stirring the mix for 2 mins.
8. Switch off the heat and let the mix cool down.
9. When you are ready to prepare the rolls, preheat oven at 375 degrees F.
10. On chopping board or on flat surface lay lavash bread. Take a spoon full of potato mix, start spreading the mix with a spoon or tool of your choice on the lavash bread to create a thin layer of the mix(you may need to take 4-5 times potato mix to cover lavash bread).
11. With both hands start rolling lavash bread, with the mix inside, as tight of a roll as possible.
12. Take a sharp knife or a bread knife, and cut the big lavash roll into 1″-1.5″ small rolls.
13. On a baking tray, lay parchment paper and place the cut lavash samosa rolls flat.
14. Once the oven is ready, keep the baking tray inside the oven.
15. Flip the samosa rolls after 15 mins (or browning/crisping of edges) to bake from the other side.
16. Enjoy samosa rolls with Green Chutney .

error

Enjoy this blog? Please spread the word :)

Follow by Email
YouTube
YouTube
Pinterest
Pinterest
fb-share-icon
Instagram